
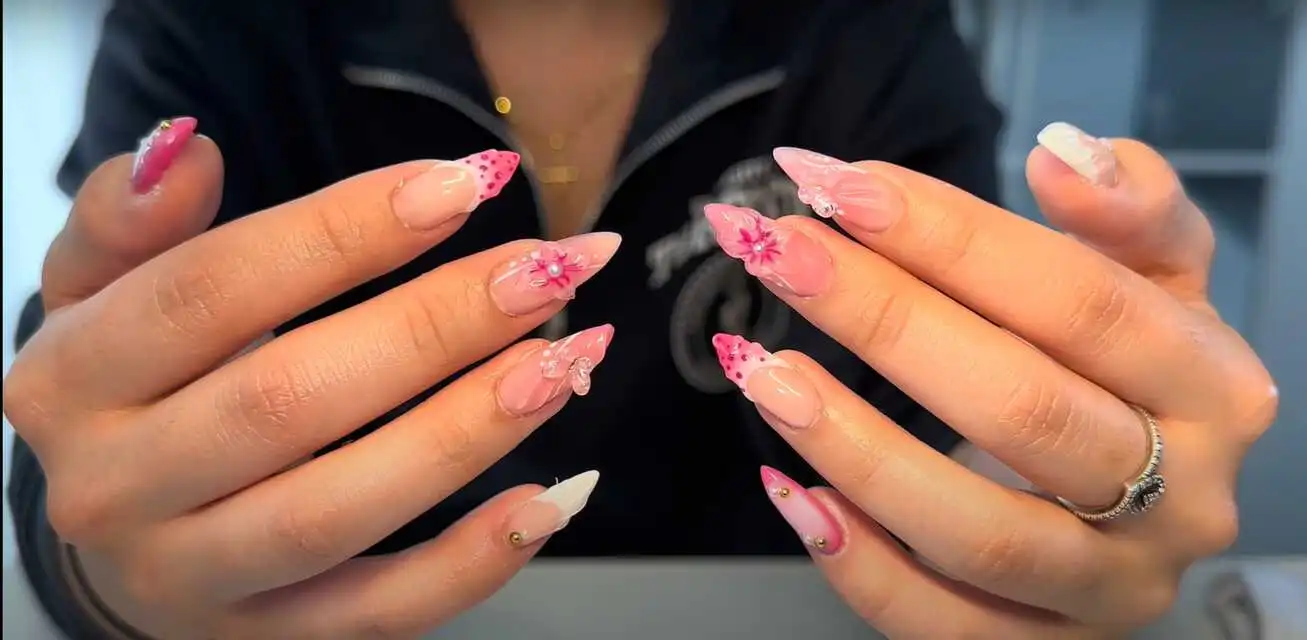
Gel X Nails are a popular, salon-quality press-on nail system. They give you long-lasting, beautiful nails at home. However, when it is time for removal or if you need a change, you must remove them safely. This guide will show you exactly how to remove Gel X Nails without damaging your natural nails. Follow these simple steps for a safe, effective gel nail removal process.
Understanding Gel X Nails
Gel X Nails are a modern form of press-on nail extensions. They use a gel formula that is cured under UV or LED light. This gives them a strong, glossy finish that looks like a professional gel manicure. While Gel X Nails are easy to apply and long-lasting, they require proper removal techniques. Removing them safely is important to maintain the health of your natural nails.
Why Removal Matters: Protecting Your Natural Nails
Removing Gel X Nails the right way is essential. If you try to peel them off too fast, you might damage your natural nails. Damage can lead to weak or split nails. Learning the proper method will keep your nails healthy and strong.
Key reasons to remove Gel X Nails safely:
- Preserve Nail Health: Avoid ripping and damaging the natural nail.
- Long-Term Care: Keep your nails in good condition for future manicures.
- Prevent Pain or Infection: Improper removal can cause pain and even increase the risk of infections.
What You Will Need
Before you start, gather all the necessary tools and products. Using the right items makes the removal process simple and safe.
Essential Tools and Products:
- Nail File: Preferably a coarse file to rough up the top layer.
- Buffer: To gently smooth the surface.
- Acetone-Based Nail Remover: High-quality acetone that removes gel effectively.
- Small Bowl: For soaking your nails.
- Cotton Pads: Soak these in acetone.
- Aluminum Foil: To wrap around your nails after applying cotton pads.
- Cuticle Oil: To hydrate your nails after removal.
- Moisturizer: For your hands and nails.
- Optional: A nail clipper, if needed to trim any loose extensions.
Step-by-Step Guide to Removing Gel X Nails
Below is a detailed step-by-step guide. Follow these instructions carefully for safe and effective removal of Gel X Nails.
Step 1 – Prepare Your Nails
Start by preparing your nails for removal. Good preparation prevents damage and makes the process easier.
Clean Your Nails
- Wash Your Hands: Use warm soapy water. Rinse well.
- Remove Any Polish or Residue: Wipe your nails with a cotton pad and acetone if needed.
- Dry Your Hands: Pat dry with a clean towel.
Step 2 – File and Buff Your Gel X Nails
Filing and buffing is necessary to break the seal of the gel overlay.
Lightly File the Surface
- Use a Coarse Nail File: Gently file the top layer of your Gel X Nail.
- File in One Direction: This weakens the bond between the gel extension and your natural nail.
- Avoid Over-Filing: Do this lightly to avoid damaging your natural nail.
Buff the Surface
- Use a Nail Buffer: Gently buff the nail’s surface to remove extra shine.
- Even the Texture: This makes the removal process more effective.
Step 3 – Soak Your Nails
Soaking softens the adhesive and prepares the Gel X Nail for removal.
Prepare Acetone Soak
- Fill a Small Bowl: Pour enough acetone to submerge your fingertips.
- Soak Cotton Pads: Saturate cotton pads with acetone.
- Optional: Add a drop of cuticle oil to the acetone to help soften the gel.
Soak Your Nails
- Wrap Your Nails: Place the acetone-soaked cotton on each nail.
- Secure with Foil: Wrap a small piece of aluminum foil around your fingertip to hold the cotton pad in place.
- Wait: Let your nails soak for 10–15 minutes.
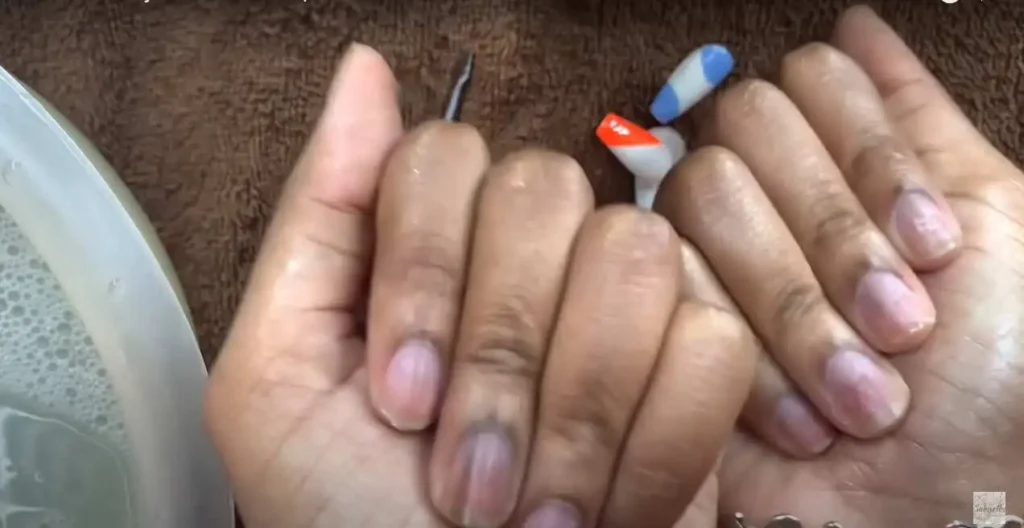
Step 4 – Gently Remove the Gel X Nails
After soaking, the gel should be soft and ready to remove with minimal damage.
Remove Each Nail
- Check Each Nail: Gently press the Gel X Nail. It should peel off easily.
- Use a Cuticle Pusher (Optional): If the nail does not come off easily, use a soft cuticle pusher to lift it gently from the side.
- Avoid Forcing: Do not pull or force the nail as it can damage your natural nail.
Clean Up Residue
- Remove Excess Adhesive: If there is some leftover gel, gently file it off.
- Wipe the Nail: Use a cotton pad with acetone to remove any remaining adhesive.
Suggested Tip: Patience is key. Let the acetone do the work rather than forcing it off.
Suggested Image: A close-up image of someone gently using a cuticle pusher to remove the nail extension.
Step 5 – Clean and Moisturize Your Natural Nails
After removing the Gel X Nails, your natural nails need care and hydration.
Clean Your Nails Thoroughly
- Wipe Off Residue: Use acetone or a nail cleanser to remove any remaining adhesive.
- Wash Your Hands: Use warm water and mild soap.
Moisturize and Nourish
- Apply Cuticle Oil: Massage cuticle oil around your nails.
- Use a Hand Cream: Apply a rich hand cream to rehydrate your skin.
- Let Nails Rest: Give your natural nails a break for a couple of days before applying extensions again.
Tips and Tricks for Safe Gel X Nail Removal
Here are some extra tips to ensure a safe and effective removal process:
- Be Patient: Let the acetone work. Rushing may damage your nails.
- Use a Timer: Set a timer for 10–15 minutes so you know when to check your nails.
- Work in a Well-Ventilated Area: Acetone fumes can be strong. Open a window or work in a space with good airflow.
- Follow Product Instructions: Always read and follow the product instructions on your Gel X Nails kit.
- Seek Professional Help If Needed: If you struggle with removal, visit a professional nail technician.
Frequently Asked Questions (FAQ) About Gel X Nail Removal
What Are Gel X Nails?
Gel X Nails are a type of press-on nail extension that uses a gel formula and is cured under UV or LED lights. They provide a glossy, salon-quality finish.
How Long Should I Soak My Gel X Nails?
It is recommended to soak your nails in acetone for 10–15 minutes to soften the adhesive effectively.
Can I Remove Gel X Nails at Home?
Yes, you can remove them at home with the proper tools and care. Follow the steps to gently file, soak, and lift the nails.
Do Gel X Nails Damage Natural Nails?
When removed properly, Gel X Nails cause minimal damage. Be gentle during removal and always moisturize your nails afterward.
Is Acetone Safe for Nail Removal?
Acetone is effective for softening gel nails. Use it in a well-ventilated area and follow safety guidelines to protect your skin.
Conclusion
Removing Gel X Nails safely is key to keeping your natural nails healthy. By following a structured process—preparing your nails, filing, soaking, and gently removing the extensions—you can avoid damage and enjoy beautiful nails every day. Remember to care for your natural nails after removal with proper cleaning, moisturizing, and cuticle oil.
Gel X Nails offer the convenience of a salon-quality look at home. When it’s time for a change, use these steps to remove them safely and effectively. Whether you are a seasoned nail enthusiast or trying press-on nails for the first time, this guide will help you maintain healthy, beautiful nails.
Embrace the ease and quality of Gel X Nails. With the proper removal techniques and regular nail care, your natural nails can remain strong and vibrant between applications.
